
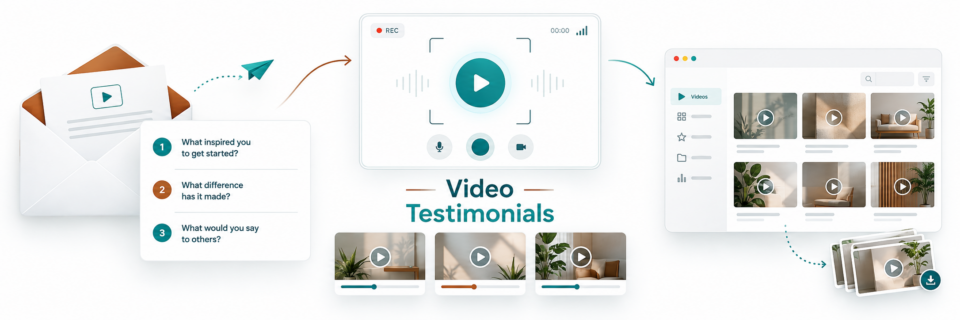
Written reviews and testimonials are useful, but video testimonials give prospects something text cannot: a real person, in their own voice, explaining what it was like to work with you. The problem has usually been collection. Clients have to record a video, figure out where to upload it, send a large file, and often answer a vague request like “Can you send me a testimonial?”
GoHighLevel’s Video Testimonials feature removes much of that friction. You can build a branded collector, guide clients with specific questions, request testimonials by email or SMS, store the responses in one place, download the clips, and even display them on your website with a live widget.
What You’ll Learn About Collecting and Managing Video Testimonials
- How GoHighLevel Video Testimonials works
- How to create a Video Collector
- How to structure testimonial questions for better answers
- When to use one question versus multiple questions
- How to request and manage completed testimonials
- How to download clips or display them in a live website widget
- A practical setup process for service businesses
Affiliate disclosure: We may earn a commission if you sign up through our HighLevel links, at no additional cost to you.
Want to try HighLevel’s Video Testimonials for yourself? Start a 30-day HighLevel trial through Marketecs and get our bonuses, onboarding resources, templates, and support.
Video Time Stamps
00:00 Why video testimonials matter more than ever
00:33 Introduction
01:11 Overview of the new Video Testimonial feature
02:00 Creating your first Video Collector
03:00 Customizing the collection page
04:45 Writing better testimonial questions
05:57 Attribution and permission settings
07:33 My recommended setup
08:40 Marketecs Engine bonuses
10:01 Sending video testimonial requests
11:32 What your customers actually see
13:19 Managing completed testimonials
14:20 Building a live testimonial widget
16:00 Final recommendations
Links
Try HighLevel free for 30 days.
Need help? Book a free consult!
Why the Video Review Collection Process Matters
Most businesses do not have a testimonial problem because happy clients are unwilling to say something nice. They have a process problem. The request is vague, the recording process feels like work, or the client is not sure what to say.
A good testimonial system should reduce those decisions. Instead of asking someone to create a polished video from scratch, give them a link, a few focused prompts, and a simple way to record directly from their computer or phone.
That is the biggest advantage of the Video Testimonials feature inside GoHighLevel. The client does not need to record a separate file, upload it somewhere else, or email a large attachment. They can open the collector, record or upload a response, add their attribution information, and submit it.
Step 1: Create a Video Testimonial Collector in GoHighLevel
Inside GoHighLevel, go to Reputation and open the Video Testimonials area. The onboarding process starts with a Video Collector.
You can create more than one collector, which is useful if your business has multiple services, audiences, or types of client engagements. A consultant might ask different questions than an agency. A law firm might want separate collectors for different practice areas. A company with several offers may want each collector to focus on the specific outcome that offer is designed to create.
Each collector includes a welcome page, testimonial questions, attribution fields, a thank-you page, and basic logo and color settings. The design controls are fairly limited, but that also keeps setup simple. The point is to get the collector live without turning it into a web design project.
Step 2: Create an Effective Welcome Page for Video Testimonials
The welcome page should make the request clear and easy to understand. Explain what you are asking for and why their feedback is useful.
If you use a spokesperson image, use a real team member or business owner rather than a generic graphic. The feature is designed to make the request feel personal. Add a short explanation that tells the client what will happen next and how long the process should take.
A simple message works better than a long introduction. The client is there to record a testimonial, not read another landing page.
Step 3: What Questions Should You Ask in a Video Testimonial?
This is the part that has the biggest effect on the quality of the final testimonial.
You can create one question or multiple questions. Each question is recorded as a separate video clip, so choose the structure based on how you plan to use the content.
Option 1: Ask One Question for a Complete Video Testimonial
Use one question when you want each client to create one complete testimonial video. You can prompt them to cover multiple points inside that single question, for example:
- What problem were you trying to solve before working with us?
- What was your experience like?
- What changed as a result?
- Who would you recommend this service to?
This approach works especially well if you plan to use GoHighLevel’s website testimonial widget, because each person appears as one testimonial instead of several separate clips.
Option 2: Ask Multiple Questions to Create Short, Reusable Video Clips
Use multiple questions when you want shorter clips that can be repurposed individually. A simple three-question structure is:
- Problem: Why did you decide to work with us?
- Experience: What was your experience like?
- Recommendation: Would you recommend us, and why?
This makes it easier to pull a short “before” clip, an outcome-focused clip, or a recommendation clip for social media, sales pages, presentations, or other marketing assets.
The tradeoff is that the same person may appear several times if you send every clip into a website widget. If the widget is your main goal, one question may be cleaner. If repurposing is the goal, multiple focused questions give you more flexibility.
Step 4: Collect Customer Information and Permission for Video Testimonials
The attribution step collects the client’s information and permission to use the testimonial. For many professional service businesses, name and email alone are not enough. You may also want the client to include a title, company name, or other context that makes the testimonial meaningful.
If those fields are not built into the form exactly the way you want, add a short instruction telling clients what information to include.
Keep the request transparent. If you offer an incentive for submitting a testimonial, the incentive should apply regardless of whether the feedback is positive or negative. The goal is to make participation easier, not to buy favorable reviews.
Step 5: Request Video Testimonials by Email, SMS, and Automation
Once the collector is ready, you have several ways to distribute it.
- Copy the collector link and send it through your normal email platform.
- Use GoHighLevel’s review request tools to send the request by email.
- Send the request by SMS when that is appropriate for the client relationship.
- Build the request into a workflow so it goes out automatically after a defined customer milestone.
Automation is where this becomes a repeatable system instead of another task someone has to remember. For example, you could trigger a request after a project is marked complete, after a successful onboarding milestone, or after a client has been active for a set period of time. If you are also working on written review requests, see our guide to automating review requests and reputation management.
Step 6: Customers Can Record or Upload Video Testimonials in GoHighLevel
When the client opens the collector, they can record directly from the page or upload a video they already created. On mobile, the experience stacks naturally for a smaller screen.
For a direct recording, the client selects the question, starts the recording, confirms the clip, and moves to the next question. After the final response, they enter their information and submit.
That simplicity is the real win. You are removing the “How do I send you this video?” problem.
Step 7: Manage, Download, and Repurpose Video Testimonials
Completed testimonials appear inside the Video Testimonials area. You can review responses by collector, see which question each clip answers, play the videos, and download them.
Downloading matters if you want to use the clips beyond the built-in widget. You can add them to a website, use them in social content, include them in a sales presentation, or create other marketing assets around them.
Keep the testimonial itself authentic. Editing for format, captions, or length is different from changing what the client meant. The value of a video testimonial comes from the fact that the viewer can see and hear the person giving it.
Step 8: Build a Live Video Testimonial Widget
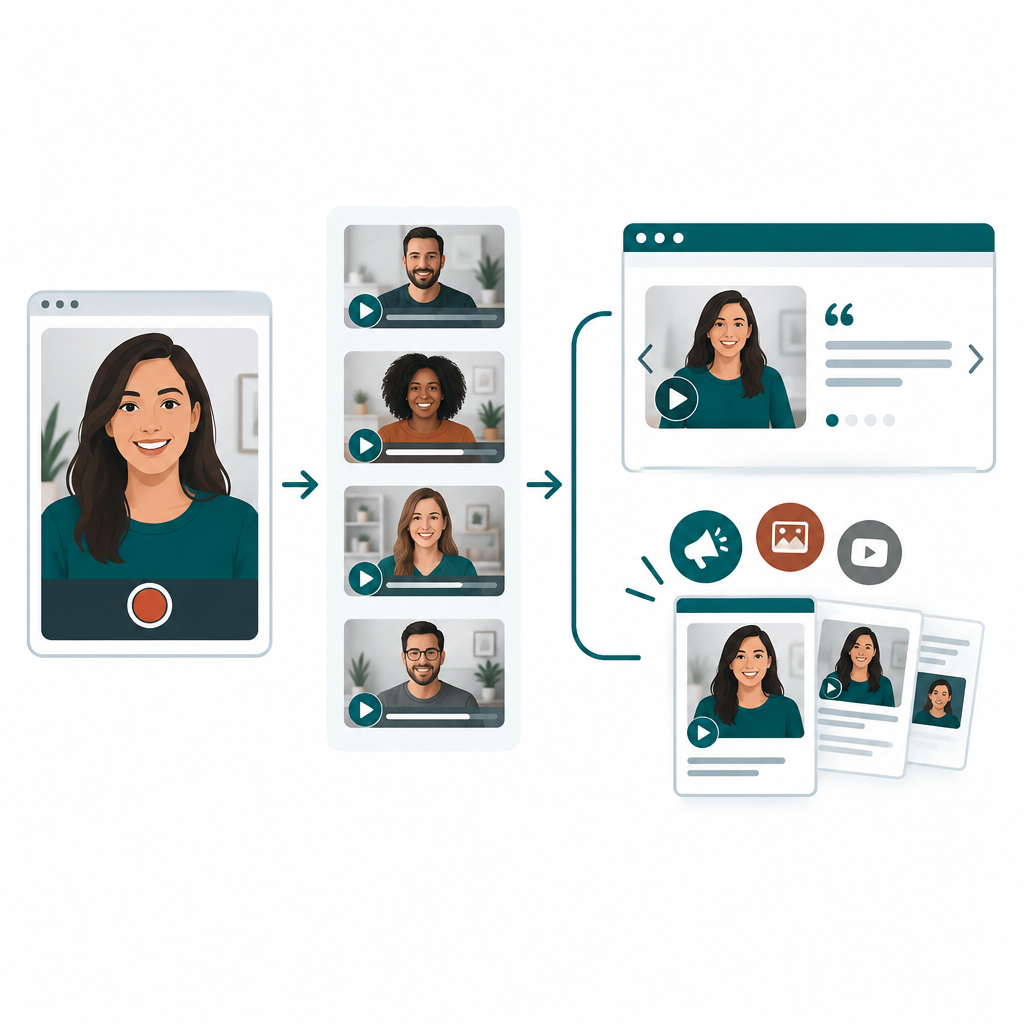 GoHighLevel also lets you create a Video Testimonial widget from submitted responses. You can choose a layout, preview it on desktop and mobile, select the source, and then copy the embed code into your website.
Because the widget is live, new testimonials can flow into the display without rebuilding the page every time. That makes it useful for service pages, landing pages, or a dedicated testimonials page.
The one-question-versus-multiple-question decision matters here. If every client submitted three separate clips, the widget may show the same person several times. If the widget is your priority, design the collector around one strong, complete response.
Set Up a Video Testimonial System for Your Service Business
If you want to get this running without overcomplicating it, use this process:
- Create one collector for your primary service.
- Choose either one complete question or three focused questions.
- Add a short welcome message explaining why you are asking.
- Request the client’s name, title, and company when relevant.
- Test the collector yourself on both desktop and mobile.
- Send it manually to three recent happy clients.
- Review the responses before automating anything.
- Once the request and questions are working well, add the process to a workflow.
- Decide whether your primary use will be a live widget, downloadable clips, or both.
The first version does not need to be perfect. The goal is to create a collection process that is easy enough for clients to complete and structured enough to produce testimonials you can actually use.
Frequently Asked Questions about Video Testimonials
Can clients record a testimonial without sending me a video file?
Yes. In the walkthrough, clients open the collector link and record directly on the page. They can also upload a recording they already made.
Should I ask one question or several?
Use one broader question when you want one complete testimonial per person. Use multiple focused questions when you want separate clips for different uses. Each question produces its own video response.
Can I download the video testimonials?
The walkthrough shows a download option in the video details. This lets you reuse the recordings in other marketing materials within the permission the client has given you.
Can I automate testimonial requests?
You can connect review requests to workflows. First test the collector and request manually, then choose a specific customer milestone that makes sense for your service.
Why does the same client appear more than once in a widget?
Each answer is a separate clip. If you ask several questions, the widget may show several videos from one person. A single-question collector can give you a cleaner one-person, one-testimonial display.
Key Takeaway on GHL Video Testimonials
The strongest testimonial system is not the one with the fanciest page. It is the one clients will actually complete. GoHighLevel’s Video Testimonials feature gives you a way to reduce recording friction, guide better answers, centralize responses, and reuse the finished videos across your marketing.
Your next step is simple: build one collector, test it yourself, and send it to three clients. Once the responses start coming in, you can decide whether to automate the request, build a live widget, or repurpose the clips elsewhere.
Click Here to read the full video transcript
Why Video Testimonials Matter
We all know how important reviews and testimonials are and at this point hopefully we all recognize the power of video, especially in the age of AI that we’re in right now. Where there’s questionable content being put out on the internet. So if you’re a business owner, quite frankly if you’ve ever bought anything online, I’m sure you’ve checked reviews, you’ve wanted reviews and even more you’ve wanted video reviews.
Today I’m going to show you an easy way to collect them that makes it so simple for your clients or your users. My name’s Kathrine Farris and I am the founder and operator behind Marketecs. We consult in marketing technology and marketing automation. We also have a platform called Marketecs Engine, which is built on the HighLevel framework but includes all of our templates and all of our best practices.
Inside the Video Review Collector
And that’s what I want to show you today is how to collect video testimonials using HighLevel or in my case Marketecs Engine. So let’s dive in and take a look. Here we are inside of Marketecs Engine and as I said this is based on the HighLevel platform. So if you’re already using HighLevel or go HighLevel, this will apply to you as well.
Now over here on the left-hand side of the menu, I am on reputation. And then on the sub menu across the top, I am in this new area for video testimonials. Now this is relatively new. I waited until a little bit of the kinks were worked out and now I’m sharing it with all of our users as well as again anyone that uses HighLevel.
You can see here when you first get in you will have an onboarding guide. You will have these four steps that they recommend that you walk through in order to start collecting video testimonials. The first one is to create a video collector, then we’re going to actually send a request and get a video testimonial and I’m going to show you what all of that looks like.
The biggest piece is this video collector for getting started. With the video collectors, you can actually have multiple and that’s what I’m going to show you here is that if you have different services or lines of service or even different niches that you want to ask different questions, you can actually build that out here. So, let’s take a look at video collector process and I’m actually going to open my demo.
You can, like I said, just click here to start from new or if you go to video collectors, you can create a collector here. You can see all of it there. So, we’re going to open this demo piece. I’m going to review and edit details. The other nice piece about these is you can open them in another tab, you can copy the link to email to someone once it’s built, you can view your responses right there, but you can also clone these, which I personally did and we’ll talk more about that, too.
All right, so when you’re in the video collector, you’re a little bit limited on editing this, which is both good and bad. For high-end web designers, you might want a little more control around this widget, you might want to put things in the places you want, change the font size. Those things are limited right now. However, for those people that just want to put the text in and start collecting video testimonials, the good news is is that’s what this is set up for.
This is set up for quick. If you look here, we have the welcome page, questions, attribution, thank you, and then we do have some logo and color features. You can see exactly where everything shows up in this preview. We’d love to hear from you shows up at the top, so you can put anything you want there. You know, give us your video.
Welcome Page and Questions
You can put any text that you want there, but it is where that text shows up, this is the size, this is the font type, those things aren’t changeable right now. You can enable a spokesperson picture if you want to put a picture in here, and I just put our logo in for an example. You can also you can put your company name and maybe an email address, or you could put your personal name, maybe you want to put your personal and they’re recommending that this actually is a spokesperson.
So, if you put your actual headshot here, and then you would put your name and title and maybe your contact information. Now, why record actually shows up here at the bottom, so just note that. Sort of the why record and welcome are almost a little swapped here at the moment. But, you can put in whatever you want them to understand about why they should record a message.
And really, I think this share this your thoughts on a quick video, that’s almost the thing that stands out a little bit more. I might capitalize on that spot just a little bit more there. So, those are the pieces. You can’t change the let’s go message, that is what it is at the moment. But, the nice thing about this is actually you can make multiple questions.
Every question you build out here will collect a separate video clip, so just know that. If you want one person to submit one long video, you might actually want to make this question more robust and actually say, “Please explain this, this, and this.” You could actually put in like one, two, and three. Although it isn’t going to format it exactly like you might want.
You’ll have to write it more as a paragraph. But, you could put in whatever you want for a question here, and you could have just the one single question. And that way, there’s only two steps, they record their video, and then they give you permission to use it. But, if you want different video clips to use across social media in order to keep them short, in order to really focus your people on exactly what they’re saying in each individual clip, I really love the fact that you can do that with multiple questions, and I’ll actually show you my example that we’re going to use for our own business.
Attribution and Thank-You Settings
So then as I said, the next step is the attribution page here. You do want to collect permission to use their name and their video. Now right now it says name and email. I know for me personally as a service-based business, I also want their title. If they’re an attorney, I want that actually there. So here in this little message up at the top, I’m actually putting also include your title or business name if you would like us to use that in your attribution.
Then you have just a nice little thank you message. Now if you’re giving any perks to asking people to do a video testimonial, and I’m not talking about gating testimonials. This is it doesn’t matter if they gave you a good testimonial or a bad testimonial. If you’re offering a discount or free shipping or some sort of perk for these testimonials, this would be a great place to put say a coupon code or some way that they can claim that perk.
And then we do have the colors and logos section that you can also add here. So if you enable your logo, it’s actually going to put it up at the top here, and it’s really designed for more of an icon. So if you don’t have an icon that you really love for your business, you might just want to disable that. And then I chose some really bright colors so you could see where they showed up here.
You can see that the secondary text is these locations, and then the accent colors is these items here. And so I know we’re looking a little Christmasy here, Christmas in July I guess, but that is just so that you could see. I did not really make any changes that I want to save, so I’m just going to click okay, and I’m going to show you really quick the one that I’m actually planning on using for our business and how it differs.
So you can see here that I did stick with we’d love to hear about your experience. I did use the spokesperson section to put in my image, name, and title. I also, under the why record, I put a little bit more description there. And under the welcome message, I made it a little bit longer around why you might want to record a message for us.
In the questions section, I did break this into three questions, looking to collect the problem, the solution, and then finally the recommendation. And so, this is why did you decide to work with us, what was your experience like, and then would you recommend us? And you’ll notice on this little preview, they can record right in screen, or they can actually upload a recording if they prefer to do it from a different device or a different platform.
HighLevel and Marketecs Options
And then on the attributions page, as I mentioned, I just said to include your title or any business name that you would like us to make public. The thank you page is pretty straightforward. It does include the information from the spokesperson section on the welcome page. And then my logos and colors are basically just on brand. I’m interrupting this video to make sure that there’s no confusion about HighLevel or about how to work with me.
If you want to try HighLevel, but don’t want to waste months trying to figure it out, I have two very clear options for you to consider. If you’re looking to build an agency or a SaaS business, head over to marketecs.com/highlevel. By using our affiliate link, which costs you nothing, you will get the following bonuses. Our Marketecs Engine Core Snapshot. This is all of the features that we install in every new Marketecs Engine user account.
And we’re giving it to you for free as an affiliate. Our onboarding guides and access to our private community. An invitation to join our weekly live office hours, where I personally will answer questions and even share tips that I’ve learned throughout the week. And I’m constantly learning. There is so many new features and things to learn in this industry as a whole, not to mention within the HighLevel platform.
Plus, we’ll give you our additional templates, checklists, and migration guide. That’s option number one. Option two is if you are a business owner just looking to improve your own tech stack, and you don’t want to do it alone. You would like a trusted strategic partner in your corner that speaks the language, brings you time-tested automations, proven strategies, and up-to-date learning. Then, go to marketecsengine.com and book a consultation with me to learn more about our HighLevel agency, Marketecs Engine, and joining our ecosystem. I’m also currently offering discounts on one-on-one consulting to any of our affiliates and HighLevel user. So, whether you’re building an agency or building a business, pick your path and let’s drive results. Now, back to your regularly scheduled programming. So, that’s the actual one that we’re using and actually what it looks like.
So, we created our video collector. And then, once you’re once you’ve done that, you’re ready to actually collect video testimonials. And there’s a couple ways you can do that. You will notice when you, again, hover over these, you can copy a link and you could just send this via Outlook or whatever email you use. You could also use this send review request option.
And here, you can actually select any contact already in your system. You could put in an address manually, and then you would select email, and if you have a default message, it would show up here. If not, you can edit this. You can do whatever you need to at that point. You see all the settings here visible. You could also do it through SMS if you chose.
Most everything I do is through email. And then, this send review request button would show up and be an option. All right, so those are two ways you can do it. There’s also a way within automations to automatically send review requests, and we have an entire other video all about the reputation management section here in HighLevel, so I’ll link to that up above, and you can go dig into that a little bit deeper.
The Client Video Recording Experience
I go over all of the tabs across the top. This is just an update for video testimonials today because I believe they’re so important. All right, I want to show you what it looks like. Let’s go ahead and open this in a new tab so that you can see what this actually looks like when it shows up when somebody gets this link.
And you’ll see here that this is on desktop, so it shows up on two sides. If it was on mobile, it would be stacked. And then when I click let’s go, you have this option tell us about your experience. And I can either record or upload, and I’m going to do just a quick recording to show you what the experience looks like.
And you can see that it looks very much like Google meeting. I’m going to click record. It gives me a little countdown. And now I can record my testimonial and it will be saved directly into the system and we’ll go take a look at how that looks, too. I’m going to click stop. It’s going to process for a minute here. Then I have to confirm my upload and it takes me to the next question.
Just to proceed rather quickly, I am going to do this with a essentially non-video. It will process this one as well. I will confirm upload again. And now I have to put in my information. Okay, so I put in my information. I clicked submit and then I get to this all done, thank you. And that’s as easy as it is. For most clients, they will be able to do that with no problem at all and they can do it on their desktop or on their phone.
This is extremely valuable in the world of video testimonials because this is what has been the barrier. The barrier has been people figuring out, well, how do I send you that video? I have to record it and then I have to email it to you. I have to send it to you somehow. We just removed all of those problems. They don’t even have to think about it.
Managing Responses and Video Review Widgets
They just have to click a couple buttons and hit submit. Now, let’s go back into the system and I’m just going to refresh and we’re going to see where those show up in the system here as you’re looking for them. Now you can see that I have four video testimonials in this demo because this is what I’ve been playing with. And so they’re going to show up in your specific video collectors here.
They’re also going to show up in all of your responses down the bottom. And in addition, you can go look at your video collectors here, or you can look at your responses here. Now, for me, because I do want to ask the multiple questions, and there’s some other things I would like to do with these videos, downloading these was important. And if you go to the video details, you have the option to download these videos, which made me very happy.
You can also play them. You can see them all about here, and you can see where it says what the actual question was, so you don’t have to guess. You’re not wondering, just in case they sort of went off the rails a little bit. In addition to being able to download these, put these on your website, and manipulate and use them however you want to, without changing the video, of course, because that’s the power of the video testimonial is that we now know it’s authentic.
The authenticity of videos is what makes them so powerful. So, now that we can utilize these, another option is actually building a widget. And if we go back to our overview tab, you’ll notice that create a video widget is the next thing on our onboarding here. What you see here, and it brought me over to widgets, is I now can do a video testimonial widget.
Now, in this case, it is going to bring each video in separately. So, this is where you may decide that you only want to ask that one question, so that each person has one video in here, and you’re very specific and very targeted. But, this is what it will look like if you ask multiple questions. You’ll see the same person’s video over and over.
You may want to pick and choose how to use this for your business, and whether you go if you go the multiple question route, you may want to download them and use them as you choose. If you go one question, then this widget will actually work very nicely. There are different layouts that you can choose. You can and the particular source that you want to make your widget out of.
And then once you have built this and customized it to how you want, and you’ll see here you can look at it on mobile versus desktop, you get the code right here where you can actually put this into any website. This is an iframe JavaScript code, and as videos are added to it, they will automatically update because this is a live widget.
So, very excited about that feature as well. We can now easily collect testimonials and then easily put them on our website and it stays up to date as they come in. All right, there you have it. There is the easiest way to collect video testimonials for your business and then display them anywhere that you need to. Download them, use them on social, put them on your website, even create a live widget.
I hope you found this useful. If you’re not already using HighLevel, definitely check the description below cuz HighLevel is so much more than just reputation management. It is a full CRM. It is all of your sales funnels, it’s all of your email marketing, even your social media scheduling. So, if you have any questions, there’s also a consultation link down below and I would love to chat with you.
Also, be sure to like, subscribe, and share this video with anyone that you think needs more video testimonials for their business. Thanks.
Ready to build this inside HighLevel? Start your 30-day HighLevel trial and get Marketecs bonuses. If you want help deciding how video testimonials should fit into your broader marketing system, book a strategy consultation.